Sunday, August 11, 2013

CSS Holy Grail: Sadness

Saw an article the other day on the "holy grail" of CSS layout: the three column equal height liquid layout.

The sad thing is that after all this time, there isn't a simple pure-CSS solution to this problem that doesn't involve extra divs and hacky behind the scenes manipulation. :(

Saturday, August 3, 2013

DDR3 Dual-Channel vs Single-Channel Performance

It was suggested to me that with modern CPUs/motherboards, running with dual-channel memory was unnecessary because there's no difference. My understanding was there is a modest performance increase in using dual-channel. I decided to do a quick test to see.

For the test I used Handbrake (0.9.9) to transcode a 187MB 1080p video. This isn't a true benchmark because the conditions are maybe too uncontrolled (hence it's a "quick test"), but I thought using a real-world application like transcoding would give an idea of the performance difference if any.

I swapped between a single 4GB RAM stick and 2x2GB sticks. It was in my low-powered HTPC, so it took a while. These are the results:

RAM typeRun #Time taken
1x4GB14m 55s
1x4GB24m 48s
1x4GB34m 49s
 
2x2GB14m 36s
2x2GB24m 37s
2x2GB34m 35s

It works out to about a 5% performance improvement using dual-channel, which is consistent with other things I've read. How that translates from a processor intensive task like transcoding to everyday use I'm not sure, I suspect it would be unnoticeable though.

Rest of the system specs, for reference:

  • OS: Xubuntu 12.04.1 (64-bit)
  • CPU: G2020
  • Mobo: Asus P8B75-M LX
  • RAM: G-Skill NT 1x4GB or G-Skill NT 2x2GB
  • SSD: Kingston V300 60GB
  • HDD: Toshiba 1TB 7200RPM
  • GPU: Gigabyte GT610
  • PSU: Antec EarthWatts 380

Wednesday, July 24, 2013

Patent Killer

Very interesting post by Joel Spolsky on how to get a patent killed.

For anyone interested in writing software and not having to play Russian Roulette with the quagmire of bad patents out there, well worth a read.

(For any software developers out there: hands up who has actually read a patent to learn how to do something?)

Monday, June 17, 2013

Fixing nVidia Graphics Tearing on LinuxMint Cinnamon

So, after installing an nVidia GTX 650TI a while back, I put up with tearing in pretty much all applications because it was easy to install and get going.

But eventually I got sick of it and tried to fix it. After trying about every fix I could find, I jumped to a different distro (from Xubuntu 12.10 to Mint 15) in the hope that might have some effect. It didn't, but I re-tried a fix I thought I'd already tried, and found it eliminated the tearing 100%.

The fix is to add this to the /etc/environment file:

CLUTTER_PAINT=disable-clipped-redraws:disable-culling
CLUTTER_VBLANK=True

This is using the nVidia proprietary driver 304.88. Hope to confirm on other Xubuntu systems whether this fix also works.

Update 20 June 2013:

Unfortunately, the fix only seems to work in Mint/Cinnamon. Title updated to reflect this.

Saturday, June 15, 2013

Fixing "mojo.run: No such file or directory" error

When trying to install something with a .mojo.run extension (for example, I was installing Dungeon Defenders from the Humble Bundle), if you get this error:

mojo.run: No such file or directory

The solution (thanks Kazade!) is to install the ia32-libs package. Then the installer should work.

(Posted this because it took me way too long searching to stumble across Kazade's post).

Update 20/10/2013:

I noticed that ia32-libs is no longer an installation target in 13.10. There doesn't seem to be an easy way to fix this, since some suggested mechanisms don't work when you've got a mojo.run file.

The only way I found to do it is detailed here: http://wiki.phoenixviewer.com/ia32-libs-in-ubuntu-13-10

The version of synaptic I was using was slightly different to that described above. In Step 4, it was "click New" rather than "other software -> add", and in step 5 the values to insert are in four separate lines:

  • Dropdown box: Binary (deb)
  • URI: http://archive.ubuntu.com/ubuntu/
  • Distribution: raring
  • Section(s): main restricted universe multiverse

Monday, June 10, 2013

Fix broken xfce4 desktop after uninstalling compiz

So, to test a theory on how to fix graphical tearing on a Xubuntu 12.04.1 install, I tried installing compiz.

Not only did it not help, but it also broke the desktop environment. So I uninstalled (followed the reverse of the compiz installation steps I did). Uninstalling though doesn't clean up everything, and the desktop was still broken.

Fortunately, I found this post which suggested removing ~/.config and ~/.cache.

You don't need to zap those entire directories though. Inside each one there is a subdirectory that starts with "compiz". Those are the directories that need deleting. After that, I rebooted and the regular xfce4 desktop was working again.

Friday, May 31, 2013

Review: Logitech K400 vs Shintaro Wireless Multimedia Keyboard

I was tossing up between a Logitech K400 and a Shintaro Multimedia (trackball) keyboard for my HTPC. I got the Logitech first for $35, but wasn't entirely happy with it so I got the Shintaro as well ($38+postage) for a comparison. These are their stories...

Shintaro Wireless Media (above) and Logitech K400

My initial reaction was that the Shintaro has a much more solid build than the Logitech. The mouse buttons were clicky and "alive", compared to the gummy feel of the K400 buttons, where you're never quite sure if you've actually pressed it.

The key layout was also much better, and almost for that alone I'd take the Shintaro. The placement of the right shift key and up arrow buttons on the Logitech continually annoyed me. The Shintaro is closer to a "normal" keyboard layout.

Shintaro positives:

  • Solid feel and nice clicky buttons, has a quality about it.
  • The keyboard layout is close to a regular desktop keyboard. Minimal pressing the wrong key when reaching into the shift/enter/arrow key area.
  • I think I prefer the trackball to a touchpad.

Shintaro Wireless Media keyboard

Shintaro negatives:

  • Size of the USB receiver. That thing is enormous. I ended up connecting it via a USB extension cable from the back of the case, because it looked so precarious hanging out the front.
  • Wireless connectivity can perform really badly. Even with a direct line of sight and less than a metre distance, having the keyboard sitting in the wrong place on your knees can mean up to 80\% dropped characters. When it was connected it was fine, but I still haven't quite worked out what positions will cause it to go bad. (Even a direct line of sight < 3m sometimes drops the occasional character when typing).
  • The board "goes to sleep" really quickly. Spinning the trackball doesn't wake it up either, you've got to press a key. I'm so used to bumping the mouse to wake up a computer, it takes a bit to get used to.
  • While the build quality is nice, it is quite bulky.
  • I sometimes had trouble getting into the BIOS with this keyboard.
  • It has a "sync" step you have to perform by pressing a button on the receiver. I seemed to lose sync occasionally, but this may have just been the wakeup problem noted above.
  • Takes four AA batteries, and with an estimated 3 month life, probably falls short of the Logitech in that respect.

Logitech positives:

  • Rock solid wireless connection. I was typing thing in another room with no line of sight.
  • Tiny USB receiver and no need to sync. Just works.
  • Size-wise, the keyboard is nice and compact.

Logitech K400 wireless keyboard

Logitech negatives:

  • The flimsy build quality and gummy feel of the keys and buttons. It just felt really cheap, and was difficult to know when you'd clicked a button.
  • Keyboard layout was problematic. In particular, the Right Shift key is much smaller than normal, with the Up Arrow taking up the space. This means the Up Arrow is easily pressed when searching for the Shift key. Doing any command-line stuff during installation, this was infuriating.

The lengths of the lists don't represent who won in my test, since the negatives to the Logitech K400 and positives to the Shintaro were really big factors in my decision to keep the Shintaro.

Saturday, May 25, 2013

Case Fan Review: Antec TrueQuiet Pro, Aerocool SharkFan and Coolermaster Sickleflow

I started on a vendetta to try and get my computer to run a bit quieter. Although I think the main culprit of noise levels is the stock CPU fan, the case fans in the Corsair 300R were making some noise, so I bought a few other fans to try out.

The fans were:

  • CoolerMaster SickleFlow 120mm ($8)
  • Aerocool SharkFan 120mm Blue Edition ($13)
  • Antec TrueQuiet Pro 120mm ($20)

CoolerMaster SickleFlow (left) and Aerocool SharkFan (right)

I don't have a dB meter -- quantitative testing isn't how I roll -- so I was just going by the ear test.

The CoolerMaster SickleFlow was the cheapest and was pretty loud, louder than the stock case fan.

The Aerocool was initially really loud as well, but then I realised the "extension lead" in the packet for a voltage reducer. With this fitted it reduced the noise to about the same as the stock fan.

The Antec TrueQuiet Pro had a physical switch for adjusting the speed. At full speed it too was louder than the stock fan, but when switched down to low speed it was quieter.

Spending the extra for something like the TrueQuiet Pro is worthwhile if noise levels are important.

Saturday, May 18, 2013

NFS Mount Hangs on Network Between Two Linux Machines

I was trying to set up NFS on my local network to transfer some stuff between two machines. I thought this would be pretty easy, but there seem to be a lot of guides out there that are either out of date or more complicated than they need to be (maybe they include some advanced features, not sure).

The main problem I had was that the mount command would hang when I tried to connect the client to the server. I tried everything I could think of, and in desperation tried reversing the client<-->server direction. At that point, it worked without a hitch. Still don't know exactly what the issue was (some conflict in the setup or configuration of my server machine?), but I was ecstatic at that point it worked at all.

Here are the steps (use ifconfig on each machine to find out their IP address, or use hostnames if you've set up hostnames):

On the nominated "server" machine

  • $ sudo apt-get install nfs-common nfs-kernel-server
  • Edit /etc/exports and add the following line (assuming here that the client IP address is 192.168.1.1 and the directory to be made available is /tmp):
        /tmp	192.168.1.1(rw,sync,no_subtree_check)
    
  • $ sudo exportfs -ra
  • Check that the entry just added to the exports file is okay with: $ sudo exportfs
  • $ sudo service nfs-kernel-server restart

NFS server daemon processes should now be running.

On the nominated "client" machine

Assuming the server IP address is 192.168.1.7 and /files/remote is the directory which we will be mounting to:

  • $ sudo apt-get install nfs-common
  • $ mkdir <local-directory-to-be-mount-point>
  • $ sudo mount -t nfs 192.168.1.7:/tmp /files/remote

An entry to automatically mount can be put in /etc/fstab, but since I will only be using the NFS connection on an ad-hoc basis, I haven't done that at this stage.

Saturday, April 27, 2013

Create a Bootable USB on Xubuntu with unetbootin

To create a bootable Linux installation on a flash drive (using Xubuntu):

  • Insert the flash drive. After it mounts, use df to find the file system name (for example, /dev/sdd1).
  • Install unetbootin if you need to:

    $ sudo apt-get install unetbootin

  • Run unetbootin. *** Requires sudo access. Apparently this is a known issue with unetbootin.
  • I selected the "disk image" option because I'd already downloaded the ISO I wanted:
  • Press OK and it will expand the ISO onto the flash drive. *** Warning: This will delete everything on the drive.
  • Insert flash drive in target machine and boot away. You might have to go into the BIOS and select the USB drive as the bootable device, depending on the motherboard brand.

Update 10/6/2013:
If you want to get rid of the pesky ldlinux.sys off the flash drive that won't even let sudo delete it, do this:

$ sudo chattr -i ldlinux.sys

Then sudo rm ldlinux.sys. (Fix taken from here).

Update 19/10/2013:
If you have an Intel motherboard and boot from a USB drive and get the message "Boot error", it could be due to the BIOS settings. This forum post describes how to fix the problem, which worked on one of my old computers with an Intel motherboard.

Monday, April 22, 2013

Format Flash Drive for Big Files on Linux

By default, flash drives are formatted with the FAT32 file system. FAT32 has a file size limit of about 4.3GB.

To get around this, you can format with a file system that supports bigger files. I chose ext4 for this, you can use ext2, ext3, or others.

Who's a big boy today?

Warnings:

  • You probably won't be able to use the flash drive on Windows machines (maybe this is what you want?)
  • Performance of flash drives under different file systems can apparently vary markedly. I didn't have any issues with mine using ext4.

Here are the commands:

$ df

Use df to find out which device is your flash drive, in my case it was /dev/sdd1. (Make sure you get this right, so you don't blat your hard drive or something).

$ umount /dev/sdd1 $ sudo mkfs.ext4 -L "BigFileDrive" /dev/sdd1

After reformatting, the drive mounted with root as the owner, so I did:

$ sudo chown ash /media/ash/BigFileDrive $ chgrp ash /media/ash/BigFileDrive

And all was well.

Update 11 Sept 2013:

Trying to run this for NTFS (on kubuntu at least) can result in:

The program 'mkfs.ntfs' is currently not installed.
You can install it by typing:
sudo apt-get install ntfs-3g

But it says it's already installed. This is a known bug, a simple workaround is to just run mkntfs rather than mkfs.ntfs.

Sunday, April 21, 2013

Canon MG6250 Scanning on Xubuntu 12.10

The other day a friend of mine challenged me asked me if I'd got scanning going on the Canon MG6250.

I had never tried it, and some research showed other people were having some issues as well.

Here were the steps I took to get it going:

  • Install xsane (sudo apt-get install xsane)
  • The sane man pages refer to "backendname" a lot. The project's documentation gives the backend name for the 6250 as "pixma"
  • man sane-pixma (seems to be a man entry for each backend) tells you to that network scanners should normally be detected, but if not, add them directly to /etc/sane.d/pixma.conf
  • Edit that file and add a line of the format:
    bjnp://<ip_address>
    IP address can be retrieved from the printer settings dialog, or from the options in the printer itself.
  • After adding an entry for the printer, save pixma.conf
  • If the sane daemon isn't running (some have reported that it is running, but I had to start it manually as per the next two steps):
    • Edit /etc/default/saned and set RUN=yes.
    • Then start the sane service: service saned start
  • Run xsane

Now xsane should discover the scanner, and instead of saying "no devices found" and dying, it should run up (brings up about 4 windows). All the default settings seem to work — just press "Scan".

Saturday, April 6, 2013

Logitech C270 Webcam in Linux

TL;DR: Logitech c270 works with Linux; guvcview good.

I bought a Logitech C270 webcam for my Dad, but thought I'd try it out first and see how it works with Linux.

First thing was to install cheese (as per the suggestion at ubuntu forums):

$ sudo apt-get install cheese

(This required a restart).

Then I ran cheese from the command-line -- webcam started up great! First thing I tried was to do a video capture...and got this:

Cannot connect to server socket err = No such file or directory Cannot connect to server request channel jack server is not running or cannot be started (cheese:2518): cheese-WARNING **: Jack server not found (cheese:2518): cheese-WARNING **: Could not initialize supporting library. Segmentation fault (core dumped)

So I tried to install jack and jackd, but this had no effect.

Then this bug suggested installing "gstreamer1.0-pulseaudio".

This worked. Had one core-dump after that, but mostly worked. Cheese complained about not being able to create thumbnails for the videos that were recorded, but I wasn't too concerned about that. By default, pictures go into ~/Pictures/Webcam, videos go in ~/Videos/Webcam.

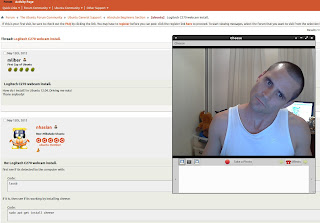
Screen cap taken with cheese running

Videos recorded with cheese at 1280x960 and 960x720 looked awful. I don't know if this is a function of using webm or something else. Dialling down to 640x480 looked much better.

Only problem: the sound wasn't working.

Couldn't find a readily available solution, so I tried guvcview, after seeing it recommended in this askubuntu question.

$ sudo apt-get install guvcview

This looked like a neat little program. Had a lot more options than cheese. But still sound wouldn't work. Went through all the sound devices in the list. The device ID for the webcam (003 on my machine, as lsusb told me) wasn't in the list. Then I had this anti-brain fart where I recalled that some devices don't work so well in USB 3 ports, and I'd plugged the Webcam into the USB 3 on the front of the case.


640x480 screenshot taken with C270 and guvcview

Plugged it into a USB 2 in the back (restarted guvcview), and BAM! New audio device appears (a "USB Audio"). This worked just fine.

I had to give cheese another go, but still no sound. So I'm not sure what was going on there, but it felt like guvcview gave better control over the capture anyway.

(For the record, they are the Natural Confectionery Co. snakes).

Monday, April 1, 2013

Script to initialise Wacom Intuos 5

To round out the setup for my Wacom Intuos 5 tablet, this is the script I run to initialise it for left-handed use with an nVidia graphics card in Xubuntu 12.10:

#!/bin/bash if [ -x /usr/bin/xsetwacom ]; then xsetwacom set "Wacom Intuos5 M Pen stylus" Rotate half xsetwacom set "Wacom Intuos5 M Pen eraser" Rotate half xsetwacom set "Wacom Intuos5 M Pen cursor" Rotate half xsetwacom set "Wacom Intuos5 M Pen pad" Rotate half # HEAD-0, HEAD-1 identify screens when using nVidia graphics. # Use xrandr output for AMD, Intel, etc. xsetwacom set "Wacom Intuos5 M Pen stylus" MapToOutput HEAD-0 fi

Saturday, March 23, 2013

Configure Mouse Speed in Xubuntu

I found the default mouse acceleration to be way too fast (particularly when trying to click on the single-pixel window borders in xfce).

To slow it down, I followed Patrick Mylund's instructions. These are the results specific to the Logitech G400.

$ xinput --list --short

This shows the names/IDs of input devices. In my case, "Logitech Gaming Mouse G400".

Now create a file ~/.xinput-mouse.sh, chmod it +x to make it executable, and add edit to include the following command:

xinput --set-prop "Logitech Gaming Mouse G400" "Device Accel Constant Deceleration" 4

Add a file xinput-mouse.desktop to ~/.config/autostart with the following contents:

[Desktop Entry] Encoding=UTF-8 Version=0.9.4 Type=Application Name=xinput-mouse Comment=Slow the mouse acceleration Exec=/home/<username>/.xinput-mouse.sh OnlyShowIn=XFCE; StartupNotify=false Terminal=false Hidden=false